
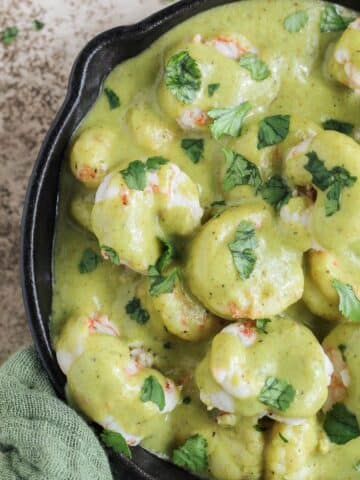
This crispy gluten free coconut shrimp are golden and crunchy on the outside, tender on the inside, and coated in a coconut crust that tastes just like your favorite restaurant version.

Recipe at a glance
- 📋 Recipe name: Crispy Gluten Free Cococnut Shrimp
- 👥 Servings: 4
- ⏲️ Total time: 20 minutes
- 🍴 Best for: Weeknight dinner or game day appetizer
- 🥘 Main ingredients: Shrimp, shredded coconut, panko
- 🔥 Cooking method: Pan or air fryer
- 👩🏼🍳 Flavor profile: Savory and slightly sweet
- ⭐️ Difficulty: Easy
SUMMERIZE AND SAVE THIS CONTENT ON
Jump to:
Crispy coconut shrimp is one of those dishes that instantly grabs everyone's attention the second it hits the table. I've always loved ordering it at restaurants, but once I started focusing on cooking with real, wholesome ingredients at home, I knew I needed a gluten free version that didn't feel like a compromise. After a few rounds of testing (and making Brent be my official taste tester), this homemade gluten free coconut shrimp officially passed. If you love bold shrimp recipes like my honey sriracha shrimp or need something fun to serve alongside gluten free fried rice, then this one is going to go straight into your regular rotation.
What makes this recipe unique?
Instead of a basic breading situation, this recipe uses a thick, pancake-style batter so the coconut mixture really sticks and creates that extra crispy texture. There is also no deep fryer required, can be made in the air fryer and is served with a creamy homemade bang bang sauce.
Ingredients
Coconut shrimp ingredients

Bang Bang Sauce Ingredients

Can You Air Fry or Bake Coconut Shrimp?
Yes! Both are great options if you don't feel like pan frying.
Air Fryer: Spray breaded shrimp lightly with oil. Air fry at 400°F for 8-10 minutes, flipping halfway through, until golden and crispy.
Oven: Place shrimp on a wire rack over a baking sheet. Bake at 425°F for 12-15 minutes, flipping halfway. Broil for the last 1-2 minutes if you want them extra crispy.
Can I use frozen shrimp?
Yes. Just thaw the shrimp completely and pat dry before breading to help the coating stick properly.
Substitutions
Gluten-free panko breadcrumbs- If you can't find gluten-free panko you can use almond flour.
Coconut- I use unsweetened shredded coconut but you can use sweetened. If you use sweetened coconut be sure to omit the sugar in the recipe.
Gluten free flour- I like to use Bob's Red Mill 1-1 flour but any gluten-free all purpose flour will work.
Dairy free milk- You can use regular milk or if you want more coconut flavor you can use coconut milk.
Sugar- You can use coconut sugar or brown sugar.
Coconut aminos- You can use regular or gluten-free soy sauce.
Step by step


- In a large bowl whisk the egg.
- In the bowl with the egg, whisk in the gluten free flour. It will become a thick paste.
- Add in the milk and whisk till you get a thick batter, like the consistency of a thick pancake batter. If it is still too thick add another tablespoon of milk.
- In a large bowl or on a large plate, mix the panko, sugar, and shredded coconut.
- Add enough avocado oil or olive oil to cover the bottom of a large skillet and heat to medium heat.
- Add your shrimp to the batter and stir to coat all the shrimp.
- One at a time using tongs or a fork, add the shrimp to the coconut mixture and coat all sides of the shrimp.
- Add the coconut coated shrimp to the hot pan in a single layer. Cook for 5 minutes, flip the shrimp using tongs, and cook for another 5 minutes.
- While the shrimp is cooking, add all the bang bang sauce ingredients to a bowl and whisk together. Serve your shrimp alongside the bang bang sauce.
Kaleena's Tips
- Pat the shrimp dry before battering.
- Press the coconut mixture firmly onto each shrimp.
- Use one wet hand for batter and one dry hand for coating.
- Let breaded shrimp rest 5-10 minutes before frying for better adhesion.
- Don't flip too early or the crust can fall off.
Storing and reheating
Storing: Store leftover shrimp in an airtight container in the refrigerator for up to 3 days.
Reheating: For best results, reheat in the oven at 350°F for 8-10 minutes or in the air fryer at 375°F for 4-5 minutes. Avoid microwaving, as it softens the crispy coating.
If you make this recipe, I'd love to hear what you think! Leave a star rating or drop a comment below. Your feedback means so much to me! And if you snap a photo, tag me on Instagram at @kaleenas.kitchen so I can see your version!
Recipe

Crispy Gluten Free Coconut Shrimp with Bang Bang Sauce
EQUIPMENT NEEDED
- large skillet
Ingredients
Coconut Shrimp
- 1 pound shrimp peeled and deveined I don't leave the tails on but you can
- 1 cup gluten free panko crumbs
- 1 cup shredded coconut (unsweetened)
- ⅓ cup gluten free flour
- 1 egg
- 2 tablespoons sugar
- 2 tablespoons dairy free milk or regular milk
Bang Bang Sauce
- ½ cup mayonnaise
- ¼ cup sriracha
- 2 teaspoons coconut aminos
- 2 teaspoons rice vinegar
Instructions
Bang Bang Sauce
- Add all the sauce ingredients to a bowl and mix together.
Coconut Shrimp
- In a large bowl whisk the egg.
- In the bowl with the egg, whisk in the gluten free flour. It will become a thick paste.
- Add in the milk and whisk till you get a thick batter, like the consistency of a thick pancake batter. If it is still too thick add another tablespoon of milk.
- In a large bowl or on a large plate, mix the panko and shredded coconut.
- Add enough avocado oil or olive oil to cover the bottom of a large skillet and heat to medium heat.
- Add your shrimp to the batter and stir to coat all the shrimp.
- One at a time, using a fork or tongs, take each shrimp and coat it in the panko coconut mixture.
- Add the coconut coated shrimp to the hot pan in a single layer. Cook for 5 minutes, flip the shrimp using tongs, and cook for another 5 minutes.
- While the shrimp is cooking, add all the bang bang sauce ingredients to a bowl and whisk together. Serve your shrimp alongside the bang bang sauce.
Notes
- Pat the shrimp dry before battering.
- Press the coconut mixture firmly onto each shrimp.
- Use one wet hand for batter and one dry hand for coating.
- Let breaded shrimp rest 5-10 minutes before frying for better adhesion.
- Don't flip too early or the crust can fall off.
Nutrition
*nutrition information is an approximate
Share this recipe on Facebook
Hi, I'm Kaleena!
Here you'll find wholesome comfort food made with real ingredients and big flavor. I share easy, approachable recipes designed for everyday life, from 30-minute dinners and simple side dishes to cozy soups and crowd-pleasing favorites.
Many of my recipes are naturally gluten free or easily adapted with simple swaps, but the focus is always on real food that tastes amazing and feels doable. Whether you're cooking for a busy weeknight or a relaxed weekend at home, my goal is to help you feel confident in the kitchen and enjoy cooking meals you're excited to make.

Leave a Comment